Miniware TS101 Shelf for Honeycomb Storage Wall v1
Preface
If you haven’t seen it yet, check out our blog about Honeycomb Storage Wall (HSW). It is a novel wall mounting project that is publicly available for download and use for free. The creativity others have contributed to expanding the usablity is amazing! It is hard to find good communities like this one. So it is only right to contribute back. This is the second contribution to the community that we have made. We hope you enjoy our contributions as well as the many others to be explored at printables!
Purpose
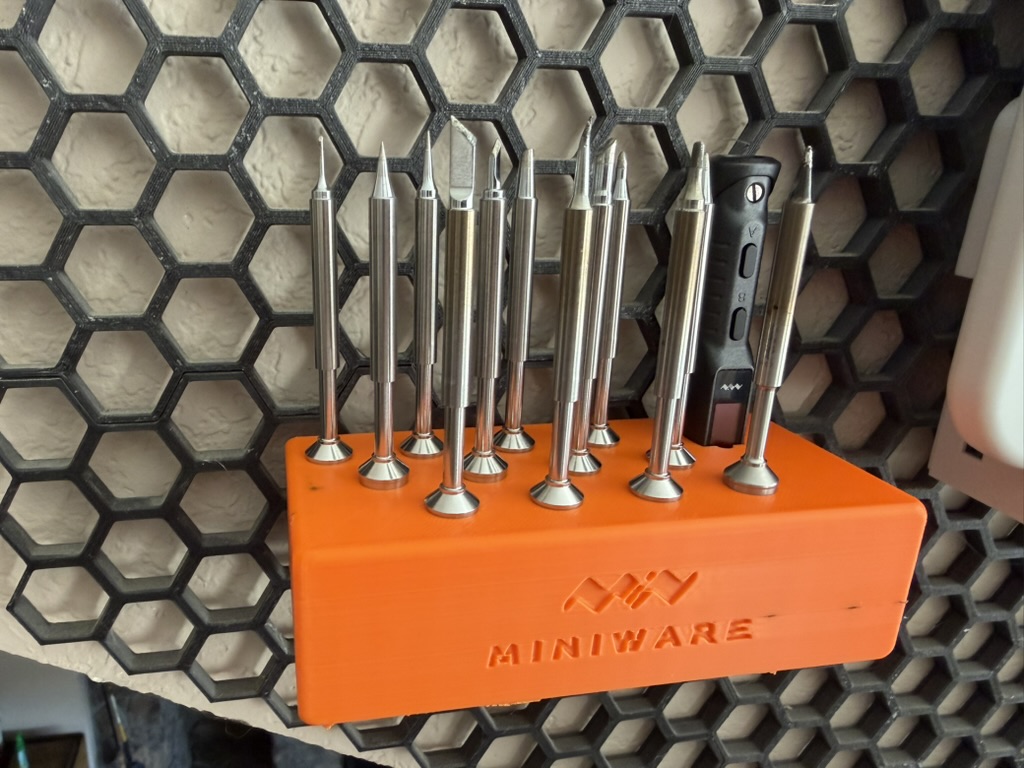
My desk is often full of clutter. Purchasing a soldering tip pack to help with some of the projects laying about helped me clean a couple of them off. But then it created more things with no particular home! Seeing the iron and the tips laying about next to my caliper got me thinking a 3D printed addition to HSW would be the perfect place.
Choosing the 3D modeling software
I have previously built models using Autodesk Fusion but it seems that their licensing model has changed since. I had to set out to find a suitable alternative.
FreeCAD
My first attempt was with FreeCAD. At first glance, it looked more than capable of accomplishing the task. Digging in a bit deeper I found the workflow for building to be unnatural compared to Fusion. The structure of the model is slightly confusing but I was able to use it to create a different model successfully.
OpenSCAD
As an alternative, I reached out to a friend who offered OpenSCAD as an option. There was an immediate appeal as they mentioned the whole model can be scripted. This was a welcome change as I have yet to master the 3D spatial navigation well enough to make models as precise as I would want them to be. Having the ability to adjust position and sizing precisely helped me quickly create the shapes necessary lay the foundation for the model. From there, a quick study of the API documentation provided the tools needed to get the first fitting of the iron and tips done.
Model Adjustments & Considerations
- Hexagons Connectors As a preference, I did not want the hexagon connectors to be visible when the model was mounted on the wall.
- Tip Visibility The first iterations had the tips placed in a grid. The tips placed in the front obscured those in the back so an offset positioning helped improve visibility.
- Iron Depth The tips have varying height. I wanted the height of the iron to be visibly similar but not exact.
Learnings & Upcoming Changes
- OpenSCAD functions Precise shapes lack style. Learning how to create smooth shapes was probably the hardest thing about this model. Check out the learnings specific to SCAD in this blog.
- Tip Fitting The tips I purchased have slightly different diameters and fit tighter than others. This makes it difficult for them to sit snug and properly. I don’t want to have to put too much force going in or require too much of a grip getting them back out.
- Tip Placement While they remain visible, the tips are still a little crowded. Reaching for a specific tip is often challenged by others leading to a poke or few.
- Offcenter My excitement of getting a test fit working led me to print a “final” version and ship the model to printables in haste. After looking at the final product though, I noticed the placement of the holes is shifted on the model making them offcenter. While still aesthetically appealing from certain angles, it lives in my head rent free.
- Model Size The large brick seems like a big waste of material and is a bit boring. I have a couple thoughts on a new design to address this and the previous concerns… coming soon.
- Pre-existing Model
In my brief search for a community model, I did not locate a
remixfor the HSW that suited my needs. However, later on I did come across a model that was posted on printables. It did not show up in my search because I was focused on remixes that were linked to the HSW project and this one is not. It would not have worked for me but check it out.
Thank You
References
(May incude affiliate links)
This isn’t the exact one I have but I learned something from the one I bought - it does not come with a power supply. While you can power via USB, this kit includes a 96W power supply which is difficult to find via USB aside from some laptop power supplies and top end wall chargers.
First one I tried and it worked. Aside from the slight inconsistency mentioned above, they have met all expectations.